About Us

This is a blog started by the Watts girls as a way to share and publish recipes, craft ideas, and other goings on in our lives. Here we can each follow along with each other (as can our readers) as we embark upon all of our creative endeavors!

Sunday, September 12, 2010

GREAT finds!


This week I discovered a new consignment shop in Jackson. Of course, now I can't remember the name of it; I'll have to add it later. The items there are in great shape and the prices are pretty good. I found this cute skirt, that I just had to get to see what I could create with it. It looks brand new and is the perfect size for a nice large bag.
When I got home I started going through the stash - what did I have that I could use for the lining?
I was really excited to find the fabric below, right there in the crate containing the black fabrics. PERFECT! The skull even matches. Now I can't wait to get started on it; just as soon as I finish the pet bandanas, this is the next creation!

I haven't decided on the straps yet - possibly the same fabric as the lining, or maybe a solid black. I want to leave the pink ribbon belt in place, and I think I would have a hard time matching it. I am ready to get finished with the bandanas now, so I can get started on this bag. It's like that for me when I get something new that I am excited about. I have a hard time finishing what I'm working on in my excitement about the new creation. I'll post a photo soon of the finished product.

Pet Creations


With 4 craft shows coming up in the next 6 weeks, I've been pretty busy! For the week, I have been concentrating on my four-legged customers, creating over 75 new pet bandanas, in 4 sizes. I plan on making at least 25 more, and will be more selective with the fabric on these. I want to do some in college prints, john deere, and some others. For the first 75, I was using up a LOT of scraps in my stash. What you see here is the largest size (20" from point to point at the top of the triangle) and the smallest (7" across the top).


This is a unique pattern that Alison helped me develop. She had bought one for my grand-dog, Penny, that had a casing at the top, to fit over the collar. She asked if there was a way I could add a way to make the "ring" on the collar (where the leash attached) come through the bandana. As you know if you've ever put a bandana on a dog, it ends up under his chin, becoming more of a bib than a bandana! So, I added a buttonhole and we tried it out on Penny - it worked! I've sold quite a few through the years, but really needed to replenish my stock for the shows.


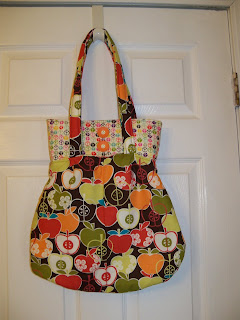
The one in this picture is the one I thought Carrie was going to take home tonight for another of my grand-dogs, Mumble. The colorful peace symbols will look great against his black coat, and it matches the new purse that I gave Carrie while she was home. She picked it out from some I had made; the top of it is the same fabric as the bandana. I'm going to drop it in the mail to her, I think she just forgot that she hadn't packed it. They'll look great out taking a walk! Here's a couple of shots of Carrie's new bag. When I saw this fabric in an online store, Hawthorne Threads, I knew I had to have it for fall! The buttons are vintage, that I bought at an estate sale - aren't they great?


Thursday, August 26, 2010

Pan Seared Tilapia with Strawberry Salad

A light fish and fresh salad makes for a perfect summertime dinner! Yum! This meal for two was very quick, easy and delicious!

Pan Seared Tilapia:

2-4 boneless fillets of Tilapia (depending on how many pieces you each want)
1/3 stick of butter
1/2 teaspoon of minced garlic
Seasoning (I used a Mediterranean seafood seasoning blend)
1/2 of a lemon

Season the fish on both sides and set aside. Melt butter completely (until starting to be foamy) in a skillet over medium heat. Once it is melted, add the garlic. Heat for about 30 seconds, then place the fish fillets into the pan. Sear for about 4 to 5 minutes per side, being careful to only turn once to prevent the fish from falling apart. When you only have about 1 to 2 minutes left to cook, squeeze juice out of the lemon half into the pan. When fish is done (it should flake easily) remove from pan and place on a plate with paper towels to remove excess oil before serving.

Summer Strawberry Salad:

Toss together the following-

Mixed greens (5-6 oz package)
Strawberries, sliced (I used about half of a 1 lb package)
Blueberries (I used about 1/3 of a 6 oz package)
Small mandarin oranges (I used jarred ones and removed just a few spoonfuls from the juices)
Candies pecans (about 1/4 cup)

When your ready to serve, sprinkle each serving with some crumbled goat cheese and drizzle with Rasberry Vinaigrette.

Enjoy!

Posted from Blogium for iPhone

Monday, July 26, 2010

Curtains and Tablecloth for Mandy's Dining Room


My friend Mandy has been working on redecorating her apartment for some time now, and as one component of that process, decided she wanted to put up a curtain between her kitchen and her dining area, which are separated by a wide opening rather than a regular doorway. When she decided to host a Afternoon Tea (for my birthday party, actually) in her apartment, that put a timeline on getting those curtains installed.

She loved the look from this picture, which she saw on the blog "Live Creating Yourself."


So this acted as her inspiration for the look she wanted to create, and originally she looked for curtains that had this wide black and white stripe. When that search failed, "Plan B" was "We can get the fabric and just make the curtain." Since I'm the one who knows how to sew, "we" meant me :)

Mandy found this perfect fabric at IKEA (they actually have a really great selection of household fabrics there) -


And I went to work measuring, cutting, ironing, pinning, and sewing. Mandy helped with the ironing and pinning of the seams. Here are some "action" pictures of the making of the curtains:


It was quite a production to make these curtains. I don't think I've ever made full length curtains before this, and I was very nervous that they wouldn't come out right, wouldn't hang the way she wanted them to at the top, or just wouldn't be perfect. We measured floor to ceiling multiple times, and then I drew out a sketch of the measurements, planning for the seams and also for the "pocket" at the top, but somehow, I still managed to over-calculate the length, and I had to cut 5 more inches off the bottom after I thought I was done and re-hem the bottom seam.

Mandy wanted the curtains to hang across a wire that she also bought at IKEA (more about installing this wire later), and to have a gathered / pleated look rather than hanging straight across. The fabric we found was only a few inches shorter in width than the opening / doorway. We bought enough yardage, therefore, for two panels, giving enough width to really bunch or gather the top the way she wanted.

The side seams on each panel were one inch seams, double creased (meaning we creased one inch in, then folded over again and creased with the iron). The bottom seam was a little over one inch, also double creased.

For the top "pocket" I wanted it to have a seam at the top with at least an inch of fabric above the seam, and then a wide enough pocket that if she chose to use it on a pole later rather than the wire, it would still fit. The pocket itself was 3.5 inches, and the top seam above that was one inch. So to do this, I first made a one inch single crease at the top of the fabric all the way across. I then folded it down about 5 inches down. I then hemmed the fabric first across the bottom, in the middle of where the folded piece was now tucked under, to make the bottom seam of the pocket; then made a seam across the top of the panel, about one inch in.

Almost done:


Then came the hard part. Because these curtains were being hung across the top of a wide opening, regular curtain rods would not work. Mandy found these curtain wires at IKEA that allow for more flexibility in terms of where they attach to the wall:

If you assume this thing is simple, you'd be wrong! So the process is to attach the hardware at one end where you want it to be (which took some trial and error in terms of what kind of screws actually went into the wall in her apartment), and then you insert this wire into a hole at the end of the hardward, and tighten these tiny little keys (those tiny little screw-looking things) into it to hold onto the wire. Then you pull the wire across to the other side, where you have also attached hardware, and after a very complicated measuring and cutting process (which would have been easier had we had the right wire cutters), you insert the wire into that end, tighten the keys, and then tighten the hardware itself to pull the wire taut. As if this process wasn't complicated enough (and believe me, my description of it sounds a lot simpler than the real life version; let's face it, I just don't want to relive the horror it actually was by truly describing it in detail to you!) - our process was complicated further by the fact that we had to put the curtains onto the wire first. Otherwise, how would one get those curtains on that wire? IKEA leaves this out of its instructions, I guess assuming you'll use curtain clips or something, although I swear when I saw it in the store the curtain was actually hanging on the wire too. In any event, Mandy didn't want clips, and so we had to figure it out. It involved one of us standing on a chair bearing the weight of the curtains and attempting to hold them so that the wire was as close as possible to being straight across the room; the other standing on a ladder with the tools, trying to force the mutilated end of the wire into the tiny hole and tighten everything without losing the key; both of us sweating and cursing and more and more irritable about the whole thing. It took a few hours, honestly. I'm sure someone out there has a post on some other blog or whatever about how simple these things aren't, and maybe we were just doing something wrong, but it was really a nightmare. Finally, in the middle of the night, the curtains were up!

And here is the finished product:


While I was making these curtains, Mandy also needed a new tablecloth. Her dining table is a round table for four, but it has an extra leaf you can put in to make it a 61" long oval table, which she needed for the Tea Party.

She also found fabric at IKEA for this project:


This was much easier to do, of course. I just measured and cut so that there would be about a 5" to 6" drop on all sides, then did a 3/4" double creased seam and hemmed it all around, tucking in or "mitering" the corners for a cleaner look.

Here is the finished tablecloth:


When it was all done and together, it looked fabulous, very sophisticated and modern. Mandy's vision for this room was perfect. I never would have believed that a big curtain hung to cover an opening between rooms would make a space look bigger rather than smaller, but it really does. The dining room is now it's own separate entity and somehow seems much more spacious than it was before. The simple black and white made a nice addition to her room, which has black and white furniture (a white table with black chairs), very colorful "gallery style" wall art on two sides, and a beautiful brightly colored chandelier from Urban Outfitters. Here are some more pictures of the room:


Thursday, May 20, 2010

LOVE this!

I got this from my friend Alison Shields, who walks with the FBC Relay for Life team in Jackson. It reminds me of WHY we walk.....

They Walked.
The chilling, soaking rain fell as if mocking their efforts, but it was hardly noticeable to the line of soldiers who had set out on their mission hours before.
They all had their reasons for walking.
Some walked because the beast had taken a loved one; some because they had battled the beast…and survived. Some still battled the beast and with the hope of a miracle in their hearts.
Still some walked because they believed it was the right thing to do.
A few of them walked in silent reverence; a face of the voice of a fallen loved one still lingering in their mind.
Some chatted and remembered days past or made plans for days ahead. Others laughed and joked to pass the time; still, there was a reverence.
Always a reverence.
There was no judgment.
Black, while, left, right, man, woman, aged, youth all gathered as one.
Wealth walked with poverty. Able walked with disabled.
The ones who couldn’t walk were helped by the ones who could. Strength was found in the acts of the weak, bravery was found in the triumphs of the meek.
Time crept by.
The late night chill numbed fingers and toes, beckoning them to seek the shelter of a warm bed.
Fatigue reared its ugly head. The clock slowed to a snail’s pace.
Still they walked.
Every mile meant a chance.
A chance for a mother to hold her son again, a chance for a husband to hold his wife again…just one more chance. A chance that one more person would survive the beast’s brutal attack. A chance that one day the beast would be beaten back.
The soldiers held onto this thought in every step of every mile in every hour that they walked.
As long as they walked there was a chance.
Please….just one more chance.
The rain fell in a futile effort to put out the fire burning within the soldiers’ souls, but the warmth of their hearts far overpowered any ills that nature could conceive.
A few of them pulled collars up and rededicated their minds to why they were there.
None of them would have been anywhere else at that moment.
All of them shared a dream….
And, so, they walked.

Friday, May 7, 2010

Mexican Casserole

I made up a new Mexican Stovetop Casserole the other night with hamburger helper as the "base"! I used a mexican hamburger helper, and (of course!) for the life of me, I can't remember the name of it, but it was like cheesy enchilada or something along those lines. It had rice in it instead of noodles. ANYWAY - it was yummy and here is the basic recipe:

1 box HH Cheesy Enchilada
1 - 1 1/2 pounds ground beef/chuck/round or turkey
1 can Green Giant southwest corn
1 can diced tomatoes
2 cups shredded cheese

The best thing is that if you wanted to make this go further, it would be easy to do. Add 2 cans of corn, 2 cans of tomatoes; or you could do a can of black beans and a can of corn. I also think it would be good with a can of green chilies.

Make the HH by package directions. When you get to the part where you reduce the heat and simmer, that's when you add the extra stuff, except for the cheese. Then, when there is about 5 minutes left, add the cheese. I served it with sour cream.

Monday, May 3, 2010

Strawberry Pie

Stephanie's friend Stephanie brought over dinner one night while I have been here; a great chicken casserole and this YUMMY strawberry pie, which I think I'll be able to adapt to almost sugar free.........She used fresh strawberries, which I believe DEFINITELY make a difference!

STRAWBERRY PIE

Graham cracker crust 1 cup water
1 cup sugar 2 ½ cups chopped strawberries
3 Tbps. cornstarch 3 oz. package strawberry jello

Cook water, sugar, and cornstarch on high in microwave for 3 minutes. Stir well and cook for 2 more minutes. Stir quickly. The idea here is to make sure you get rid of all the lumps.
Add jello and strawberrie,s and stir well.
Pour into pie crust.
Chill until set.
Top with Cool Whip and garnish with strawberry slices.


*I do step one on my stove top, but either way works well.

*One time I did not have a store-bought pie shell, or regular flavored graham crackers, so I used my cinnamon flavored graham crackers to make a homemade crust and this pie was AMZING!! I even had requests from the couple that we had over for dinner to bring it over to their house for our next meal together!

Friday, April 30, 2010

Spinach with Feta and Pine Nuts

This was my second side dish in the meal with Salmon with White Wine Sauce (the other was the Roasted Tomatoes).

Ingredients:

Baby Spinach - one package, about 10 ounces (note: you can buy fresh spinach, or frozen)
Olive Oil
1-2 Tbs of Lemon Juice (if you are preparing this with the Salmon recipe, you can use some of the lemon juice that is remaining from that dish)
Crumbled Feta Cheese
1/4 cup Pine Nuts

Directions:

If you are using frozen spinach, follow the directions on the package to cook. I don't add any salt to the spinach, even if the directions call for it, because the Feta itself is so salty. Once the spinach is done cooking, drain any excess liquid and toss with about 1 Tsp of olive oil and pine nuts. You can either toss in the Feta or sprinkle on the top when you are serving it.

If you are using fresh spinach, heat 2 Tbs of olive oil in a pan. Add baby spinach and cook, tossing almost constantly, until tender. This will take about 3 minutes or so. Toss with pine nuts. Either toss in the Feta or sprinkle on top of each serving.

Roasted Tomatoes

I served these as a side dish with the Salmon with White Wine Sauce (and tossed spinach with pine nuts and feta cheese). There are many variations to this, and you can play around with flavors, etc and try out different things. Here's what I did:

Ingredients:

about 4 fresh Roma Tomatoes, cut in half lengthwise
Olive Oil
Thyme
Minced Garlic (I don't know how many cloves; I use the already-minced garlic you can buy at the grocery store)

Directions:

You will be first baking and then broiling the tomatoes, so use a baking sheet that will also fit in your broiler. If necessary, you can probably remove the sheet that comes in the broiler and use this directly in the oven too. If this won't work, use a cookie sheet and then remove from there and place on the broiler sheet/pan later.

Preheat oven to 400 degrees.

Place halved tomatoes on a cookie sheet / broiler pan sprayed lightly with cooking spray / oil. Drizzle olive oil over the tops of the tomatoes. Sprinkle with Thyme. Place in oven and cook for about 20-25 minutes. Check tomatoes, you may want to add a little more oil. It should start to look almost as if they are caramelizing. Cook about 5 minutes more.

Remove from oven and put garlic on each tomato. I put about 1/4 teaspoon of minced garlic on each tomato and spread it out a little.

Place into broiler and broil for 5 minutes or less. You want the tops to just start to brown, but not to become blackened.

Serve hot as a side dish.

Some thoughts on variations:

As Mandy and I were eating these delightful tomatoes, we thought of lots of options. One would be to add a little bit of Parmesan cheese or Mozzarella cheese to the tomatoes when they are broiling. Another idea was to serve with Feta cheese (sprinkle on after you remove). And of course, you could switch up the herbs. I liked the flavor of just the thyme and garlic, but basil would probably be delicious as well.

Salmon with White Wine Sauce

Last night for dinner, I made a delicious Salmon with White Wine Sauce, served with Spinach & Feta Cheese and Roasted Tomatoes (see separate posts). Here's the recipe for the Salmon (for 2):

Ingredients:

2 Salmon Fillets (I like to use the thicker pieces, rather than the long skinny type)
1 lemon
1 green onion, thinly sliced (note, you can use shallots instead, or even chives if you prefer)
Salt
1/2 stick of butter
1 Tbs of flour
1 cup of dry white wine (I used Sauvignon Blanc)

Directions:

Cut lemon in half and squeeze out most of the juice (set juice aside)
Spray baking dish with Pam / Cooking Oil. Place Salmon pieces in the dish and put the two lemon halves that you have taken the juice out of in the pan as well. The lemon "hulls" as I call them will give a slightly lemon flavor and a wonderful aroma to the fish, but you don't want to squeeze juice over the salmon itself because the white wine sauce will be lemony. Sprinkle with a little of the green onion slices and season with a little bit of salt. Bake at 400 degrees for about 18-20 minutes.

Meanwhile, melt the butter in a small saucepan. As soon as the butter is melted, add the wine and flour and quickly whisk together. Add about half of the lemon juice you squeezed out of the lemon (this is according to taste - you can make it more or less lemony). Reduce heat and simmer about 8 minutes, stirring occasionally. Note that even on a simmer, this mixture should be kind of foaming, almost like it is still trying to boil. The liquid should reduce down as it cooks. Stir in the onions, and a little bit of salt to taste.

When salmon is done, serve topped with the white wine sauce.

Thursday, April 15, 2010

Free Stuff: Jewelry!

So I just read about this website (www.silverjewelryclub.com) that has silver jewelry for free! You have to pay shipping (around $6-$7) but that's it! There's no catch! The company assumes that if you go on there and get some stuff for free, you'll eventually buy something or tell your friends about it and they will buy something.

The items rotate frequently, with each one being available for about 15 minutes at a time, from what I can tell. At any given time there are about 4 items on the website that are available for free. You also can click on a link at the top of the page to see what is coming up next. It usually falls into one of three categories: pendants, rings or earrings. And most of the pieces are silver with some kind of gemstone. Check it out for yourself!

Wednesday, April 14, 2010

Potato Leek Soup

I love to make soup when it's cool outside, and even sometimes when it's not! A good soup is such great comfort food! This is one of my favorite recipes. It takes a lot of prep time, but it is delicious and good for sharing with a group!

A note about kitchen tools: I use my submersible handheld blender for this soup (and for lots of other soups). It was recently not working properly and I could not get the texture of the soup right without it! The other option would be to use a food processor or a blender - at the end of the preparation, you would remove the soup in batches to the food processor or stand blender and cream/blend it. The best I can suggest if you don't have any of these tools is that at the end when the potatoes are super-soft, you could use a traditional potato masher in the soup pan and then stir the soup to blend it together. My potato leek soup is always very creamy and very smooth in texture, but some people prefer (I guess) for it to be more mushy and chunky.

Ingredients:
5-6 medium to large russet potatoes, peeled and cut into about 1.5 inch cubes / chunks
2-3 medium-sized leeks, cut into small pieces (by the way, if you haven't used leeks much before, here is a link to a helpful blog with great tips and instructions for cutting up the leeks: http://startcooking.com/blog/183/Leeks)
1 small onion, chopped (I use a yellow onion)
1 stick of butter
1/2 package of bacon, cut into about 1 inch pieces before cooking
2 cans of chicken stock
1/2 pint of whipping cream (you can actually use a little more either whipping cream or half and half if you want it to be even more creamy)
Parsley
Salt
Pepper

For toppings (as desired):
Shredded cheese
Cooked bacon pieces
Chives

Start by preparing all of your ingredients. You won't have time to be chopping, etc once the soup gets going. I start by peeling and chopping the potatoes, cutting up the leeks, and chopping the onion, and I set each of these aside separately in prep bowls until later. I then cut up the bacon into smaller pieces using kitchen scissors so it will be ready to add to the pot.

Melt the butter in the bottom of a large pot. Add the bacon, and cook until bacon is done and has rendered most of its fat / grease. Note, you don't want to cook it until it is extremely crispy, as this will mean the grease starts to evaporate and even burn. Remove bacon from the pan but leave the liquid (now a combination of butter and bacon grease) in the pot. You may need to turn off the heat as soon as the bacon is done to prevent the grease from starting to burn before you go on to the next step.

Add the onion and the leeks to the pan and cook until the onion starts to become translucent. Add chopped potatoes and stir them into the hot grease. Add chicken broth and bring mixture to a boil. If potatoes are not covered, you can add additional chicken broth. Reduce heat and simmer / cook until potatoes are almost done / starting to turn soft, then mix in the cream. Also add salt and pepper at this point. (I use probably 1/4 teaspoon of salt, 1/8 teaspoon of pepper). Bring mixture back to a boil and cook until potatoes are starting to fall apart.

Using the hand-held blender, blend / cream the soup while it is still hot and in the pan. If you are worried about overcooking, you can turn off the heat completely at this point. Submerge the metal end of the blender in the soup mixture and blend, moving the blender around the pot frequently. Stir with a large wooden spoon, and check the texture to see if more blending is needed.

Stir in parsley, and additional salt and pepper to taste, if needed. Serve hot with shredded cheese, crumpled bacon pieces and chopped chives as garnishes. Enjoy! This will make enough soup for about 6 servings, you can easily double it for a large group!

Sunday, April 4, 2010

Strawberry Jello Cake

This is one of my very favorite desserts to make, so easy and oh so yummy! This year I decided to make it for Easter dinner at my mother-in-law's house... I hope everyone likes it... on second thought, maybe they will all hate and I can eat the whole thing myself. Pass the big spoon my way, YUM!

Ok ok, so for instructions: Start by preheating your oven to 350.


Rinse and dry one carton of strawberries. Obviously this dish is even TASTIER with fresh strawberries, but it's not quite time for that around here... so I settled for the very best Ingle's had to offer me on this Easter Sunday.


Slice the strawberries thin as you can get 'em and cover the bottom of your glass baking dish.


Ok, so I snuck a few slices, what of it? Strawberries are DELICIOUS!

Alright, so then take a can of crushed pineapple, juice and all. Pour it over the strawberries and mix it up a bit.

Man, that smells great...


Now sprinkle on to packages of sugar free strawberry jello.

My camera batteries died so there's no picture of this stage... sorry, I was on an Easter time crunch, no time for waiting on my sweet husband to change out the batteries. But here's a close up from the next step so you can see, sorta. You will completely cover the fruit with the gelatin.


Ok, now add some mini marshmallows. I think you are only supposed to add like a cup of marshmallows but... I really don't know because I usually add half of a 10.5oz bag. This time however, I was talking to Stephen and shooing away the dogs and emptied almost the whole bag in, oops! But Stephen says you can never have too many marshmallows which sounds about right to me!


Mix a box of white cake mix with two eggs and the amount of water directed on the package, no oil.

I forgot the two egg rule this time and added three (which is what the package tells you) but I don't think it will do too much damage, we'll see.


The batter can be a little lumpy, no need to worry. Pour it on top.


Stick it in the oven, doesn't it look delicious!


As a side note, taking this picture is the first time I have noticed there was a light in my oven!!!!! Who knew? It's been out since we moved in I guess, Stephen is going to have to fix that, I'm so excited!


Cook it for 50 minutes, it's gonna smell so good!


The top should come out golden brown and fantastic looking, that's right, fantastic, and the smell should make you drool a little, but just a little, I mean anything more than that is just gross, so don't do that, ok?


And the bottom will be a bubbly and yummy looking!


Now spoon it out and top it with some cool whip and you're in hog heaven. Enjoy!

Wednesday, March 17, 2010

Cheddar Burger Failure

So, Stephen and I were watching the food network channel and saw these great looking burgers. They were stuffed with cheddar. When they cut them in half yummy melty goodness bubbled out!
I thought they looked great and simple enough, right?
So I added some seasoning to 1 lb of ground beef and got to work. First, I made 8 thin patties. Then I put a pile of cheddar cheese on 4 of the patties and topped then with the remaining four patties, making a sandwich, sorta. Then I mashed around the edges to seal the two patties tightly together making one patty.
I placed these on the already hot indoor grill and listened to them sizzle.
And then....

All the cheese melted out of the burgers and completely filled the grill and even poured over the edges!!! Eeek!
So the burgers were NOT a success. But fear not my friends, I'll try again and post our next attempt.

Tuesday, March 16, 2010

Apricot Chicken Dinner for Two


Stephen and I just enjoyed a positively delicious dinner so I couldn't wait to share it with you guys!
A co-worker gave me the idea for the chicken so I played around with some ideas and came up with a really simple, really yummy version of Apricot Baked Chicken and served it with Spicy Baked Potatoes and Onions, and Caesar Salad. Deeeee-lish!

Apricot Chicken:

I had a package of pretty fat chicken breast, so I started by pounding them out so they would be kinda thin and flat so that they'll cook more evenly and faster. I don't have a meat tenderizer mallet or anything, so I wrapped the end of a rolling pin with foil and used that to pound it out. Be sure to trim off any fat or skin.


Generously sprinkle each side of the chicken breast with sea salt, black pepper, and red pepper (don't be scared, put plenty).


In a square baking dish, melt 1/2 stick of fat free butter. Add 1/4 cup of Sugar Free Apricot Preserves to cover the bottom of the baking dish. Lay the chicken on top and add another 1/4 cup of preserves on top of the chicken. Bake at 350 until chicken is thoroughly cooked (time dependent upon thickness of the breast).


Spicy Potatoes and Onions:

Cube 3-4 potatoes and 1/2 of a white onion. Sprinkle with sea salt, black pepper, and red pepper. Toss in olive oil, place on a tin foil-covered baking sheet and bake at 400 for 30 minutes.


Caesar Salad:

Cut 1 Romaine Lettuce Heart into bite size pieces, rinse and strain. Set aside.

Mix together:
1/3 cup Mayo
1/4 cup shredded Parmesan Cheese
2 tblsp Milk
1 tblsp Lemon Juice
1 tblsp California Wet Garlic
1/2 tsp Dijon Mustard
1/2 tsp Worcestershire Sauce
1 Anchovy Fillet (mashed)

Plate the lettuce, add a few croutons and drizzle with desired amount of the above dressing mixtures.


Now Enjoy!